


Skip to content
AskAnXpertAskAnXpert
  • Home
  • Support
  • Terms of Service
  • Privacy Policy
Get the app

Now in open beta

When you really want to know, AskAnXpert.

Explore cooking, travel, money, hobbies and more with AI Xperts that explain things at your pace and your level.

Join the iOS betaJoin the Android beta

Free to start · No credit card needed · Nothing to learn

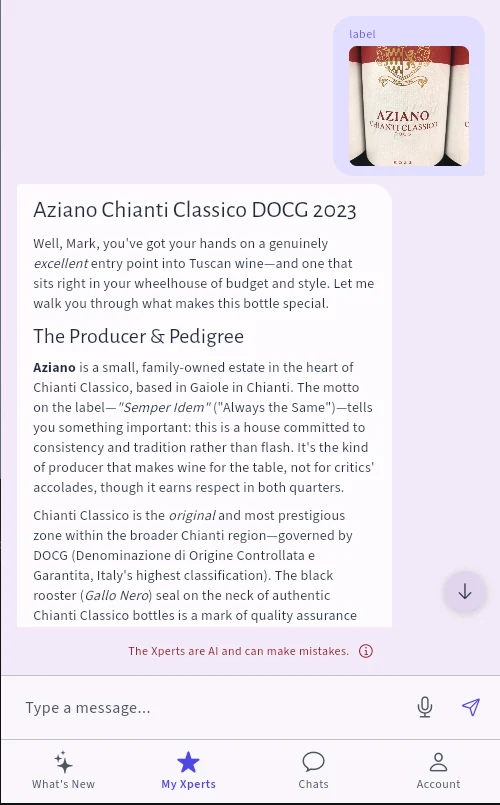
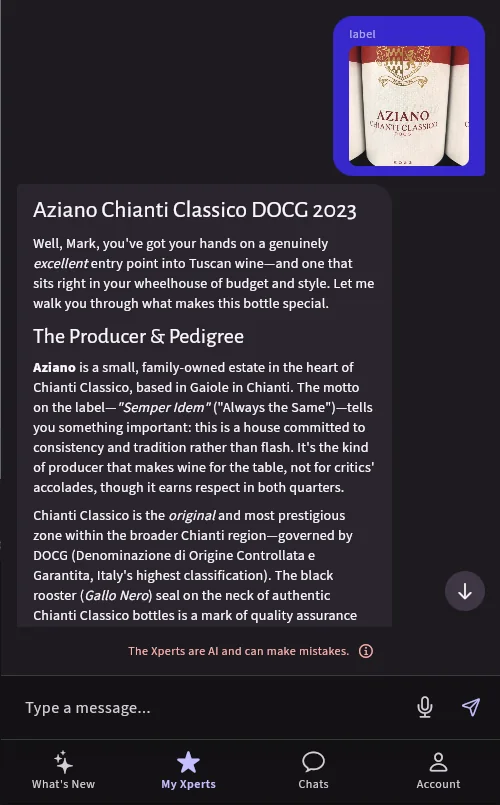
A chat in the app: the user sends a photo of a wine label and the Xpert replies with a detailed, formatted answer, followed by the line that Xperts are AI and can make mistakesA chat in the app: the user sends a photo of a wine label and the Xpert replies with a detailed, formatted answer, followed by the line that Xperts are AI and can make mistakes
Pickleball Coach, an Xpert card from the appPickleball Coach, an Xpert card from the app
Beginner Chess Instructor, an Xpert card from the appBeginner Chess Instructor, an Xpert card from the app
Expert Home Chef, an Xpert card from the appExpert Home Chef, an Xpert card from the app

Xperts help you explore the things that interest you

We've done the work of turning AI into focused, approachable guides. Each Xpert is prepared for its subject, gets to know what matters to you, and gives you quick ways to get help. Then you just chat and explore as deeply as you like.

  • Built for its subject

    Every Xpert is carefully prepared for one subject before you ask your first question. It knows what it's there to do and how to explain things clearly, so you get thoughtful, detailed help from the start.

    Your Xpert

    Comes ready

    • Focused on one subject
    • Knows what it's there to do
    • Explains things clearly
    • Knows its limits
  • Gets to know you

    Each Xpert asks about the things that matter in its subject, like your experience and goals. Answer once and it keeps that in mind, so its help fits your situation, not just anyone's.

    About you

    Your experience

    New to itSomeLots

    Your goal

    Just curiousGet betterGo deep
  • Skills make it fast and easy

    Skills are ready-made shortcuts for the things people most often ask an Xpert to do. Pick one, add a detail or two, and your Xpert does the rest. No wondering how to phrase it.

    Tell me about this photo
    Make me a plan
    Compare my options
    Quiz me
  • Just chat and keep exploring

    Ask a question, follow up, change direction or go deeper. It's a simple chat, like messaging a friend, and your Xpert follows along, so you never have to start over.

    Can you explain that more simply?

    How does that apply to me?

    What should I do next?

    Ask a question…

It's like talking to someone who really knows the subject, and who knows you.

Meet a few of our Xperts

Browse a growing catalog of Xperts for just about anything you're into, from cooking and travel to money and hobbies. Every Xpert is free to use, comes with Skills that get things done in a tap, and gets to know you as you chat. Want it your way? Tailor any Xpert to fit exactly what you need.
UX Designer

Photo by Mahmudul Hasan on Unsplash

UX Designer

Specializes in user experience, interface design, usability testing, and accessibility.

Marketing Expert

Photo by Hakim Menikh on Unsplash

Marketing Expert

Specializes in digital marketing strategies, brand building, and growth hacking techniques.

Expert Home Chef

Photo by Noel Mas Martinez on Unsplash

Expert Home Chef

Warm culinary guidance for cooks of all levels on technique, flavor, and confident cooking.

Compassionate Health Advisor

Photo by Vitaly Gariev on Unsplash

Compassionate Health Advisor

Empathetic, evidence-based health guidance simplifying medical concepts for informed decisions.

Data Scientist

Photo by Ferenc Almasi on Unsplash

Data Scientist

Masters machine learning, statistical analysis, and data-driven decision making.

Financial Analyst

Photo by Jakub Żerdzicki on Unsplash

Financial Analyst

Expertise in financial modeling, investment analysis, and business valuation.

Real questions. Detailed, relevant answers.

Ask an Xpert a question and you get a detailed, focused answer. Keep asking follow-ups to explore further, in a chat that works like the ones you already use. It feels like talking with a real expert, though every Xpert is AI. Pick a conversation to read it.

Master Sommelier Guide

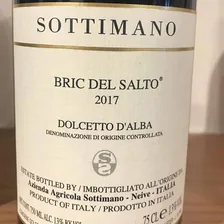
label

Photo of a wine label: Sottimano Bric del Salto 2017, Dolcetto d'Alba

Sottimano "Bric del Salto" Dolcetto d'Alba 2017 🍷

Dude, you've got a seriously cool bottle in your hands — and honestly, a perfect wine for where you are in your wine journey. Let me break it all down for you.


The Producer: Sottimano

Sottimano is one of the most respected family estates in all of Piedmont, based in the village of Neive — right in the heart of the Langhe hills in northwestern Italy. The family has been farming these lands for generations, but it was Andrea Sottimano who really elevated the estate to international recognition starting in the 1990s.

Here's what makes them special:

  • They're best known for their single-vineyard Barbarescos (made from Nebbiolo), which are considered among Piedmont's finest
  • But they treat every wine they make — including this Dolcetto — with the same obsessive care and attention to terroir
  • Estate bottled, meaning they grow, make, and bottle everything themselves — that's a quality signal worth noting
  • In my view, Sottimano represents the gold standard for honest, terroir-driven Piedmontese wine

The Grape: Dolcetto

Dolcetto is Piedmont's everyday drinking grape — but don't let that fool you into thinking it's simple. The name literally means "little sweet one," which is a bit ironic because the wines are actually dry, not sweet. The name likely refers to the sweetness of the grape itself at harvest.

Here's what Dolcetto brings to the glass:

  • Color: Deep, inky purple-ruby — this grape dumps serious color
  • Aromas: Think fresh blackberries, black cherry, plum, and licorice, often with a subtle almonds or bitter chocolate note on the finish — that's a classic Dolcetto signature
  • Tannins: Present but soft and approachable — not grippy or drying like Nebbiolo or Barolo
  • Acidity: Moderate — lower than Barbera, which gives it a rounder, more immediate mouthfeel
  • Body: Medium to medium-full — it's satisfying without being heavy

The bitter almond finish is Dolcetto's calling card. Once you recognize it, you'll always know you're drinking Dolcetto. It's like a little secret handshake the grape gives you at the end of every sip. 😄


The Appellation: Dolcetto d'Alba DOC

The label says Denominazione di Origine Controllata (DOC) — that's Italy's regulated quality designation, meaning the wine meets specific rules about where the grapes come from and how the wine is made.

Alba is one of the most prestigious sub-zones for Dolcetto in Piedmont. Here's why the terroir matters:

  • The Langhe hills around Alba are characterized by calcareous clay soils (limestone-rich) that give structure and minerality to the wines
  • The continental climate — hot summers, cold winters, significant day-to-night temperature swings — helps grapes develop both ripe fruit AND freshness
  • Neive specifically (where Sottimano is based) sits in the Barbaresco zone, which means this Dolcetto is grown in some of Piedmont's most prized vineyard land

"Bric del Salto" — The Single Vineyard

"Bric" is a Piedmontese dialect word meaning hilltop or ridge — so "Bric del Salto" literally translates to something like "the ridge of the leap." The fact that Sottimano designates this as a single-vineyard Dolcetto is significant — most producers blend from multiple plots for their entry-level wines. Sottimano is saying: this specific piece of land produces something worth naming.

That kind of attention to detail in a Dolcetto? That's a producer who genuinely cares about every tier of their lineup.


The Vintage: 2017

2017 in Piedmont was a warm, somewhat challenging year due to a spring frost that reduced yields significantly across the region. Here's the silver lining though:

  • Smaller yields often mean more concentrated, richer fruit in the grapes that survived
  • The warm growing season pushed ripeness nicely, giving the wines generous fruit character
  • For a grape like Dolcetto that's meant to be enjoyed relatively young, a warm year like 2017 produced full, round, approachable wines — exactly what you want

At 13% ABV it's also not a heavyweight, which means it's balanced and easy to enjoy over the course of a meal.


What to Expect in the Glass

When you open this bottle, here's roughly what the experience should look like:

  • Appearance: Deep purple with a violet rim — almost like grape juice dark
  • Nose: Ripe black cherry, blackberry jam, dried plum, a hint of violets, maybe some dark chocolate or licorice underneath
  • Palate: Juicy and medium-full bodied, with soft tannins, moderate acidity, ripe dark fruit all the way through
  • Finish: That classic bitter almond signature at the very end — slightly drying, pleasantly bitter, like a bite of dark chocolate

It's not a wine that demands deep contemplation — it's a wine that demands good food and good company. That's Dolcetto's whole vibe.


Food Pairing — Oh, This Is Fun

Dolcetto is made for the dinner table. The soft tannins and moderate acidity make it incredibly food-friendly. Here's what works beautifully:

FoodWhy It Works
🍝 Pasta Bolognese or meat ragùTannins cut through the richness, fruit complements the tomato
🍕 Pizza (especially sausage or mushroom)Classic Italian pairing — the grape and the dish are basically soulmates
🫕 Braised short ribs or pot roastThe soft tannins handle the fat without clashing
🧀 Aged cheeses (Parmigiano, Pecorino)The bitter-savory finish plays perfectly off sharp, salty cheese
🍄 Wild mushroom risottoEarthy notes in the wine mirror the mushrooms beautifully
🥩 Charcuterie boardsSalami, prosciutto, cured meats — this is peak Italian pairing territory

Honestly Mark, if you're making pasta night, this bottle is a total slam dunk.


When and How to Enjoy It

A few quick tips:

  • Serve it slightly cool — around 60–62°F (15–17°C). Dolcetto benefits from being a touch cooler than room temperature, which brightens the fruit and keeps it lively. About 20 minutes in the fridge before opening does the trick.
  • You don't need to decant it for long — maybe 20–30 minutes open or a quick swirl in a glass is plenty
  • Drink it soon — Dolcetto is not a wine you cellar for decades. It's designed for near-term enjoyment, and the 2017 is fully in its drinking window right now. Don't sit on it.
  • Use a standard red wine glass — nothing fancy required

The Bottom Line

Dude, this is a genuinely excellent bottle — especially as a beginner wine. You've accidentally stumbled onto a producer that most wine lovers would be stoked to have in their glass. It hits two of your preferred styles perfectly: it's got the light-to-medium elegance of a lighter red, but with enough depth and structure to feel serious.

At whatever price you paid (these typically run $20–$30 CAD), it's outstanding value from one of Piedmont's most respected names. 🤙


Next up — if you enjoy this and want to go deeper into Piedmont, you might want to explore Sottimano's Barbera d'Alba next. Same producer, same quality obsession, but with higher acidity and a punchier personality. Curious what direction you'd want to go?

what is the best way to brine a turkey?

Brining a Turkey: The Complete Guide

Ah, brining — one of the most rewarding techniques you can master! It transforms turkey from potentially dry and bland into something genuinely succulent and flavorful. Let me walk you through this properly, because understanding why brining works will make you confident doing it every time.

Why Brining Actually Works

The salt in brine does something remarkable: it breaks down some of the muscle proteins, allowing them to hold onto moisture far more effectively during cooking. This is physics, not magic — and once you understand it, you'll see why brining is worth the forethought.


The Basic Brine Recipe

This is my go-to formula, and it scales beautifully for any turkey size:

For a 12-16 lb turkey:

  • 1 cup kosher salt (Diamond Crystal, ideally — it's less dense than table salt)
  • ½ cup sugar (white or brown; brown adds subtle depth)
  • 2 tablespoons black peppercorns, crushed lightly
  • 4-5 bay leaves
  • 4-6 fresh thyme sprigs (or 2 teaspoons dried)
  • 4-6 fresh rosemary sprigs (or 2 teaspoons dried)
  • 2 tablespoons whole coriander seeds (optional, but lovely)
  • 1 tablespoon juniper berries (optional; adds a subtle pine note)
  • ½ teaspoon red pepper flakes (for warmth)
  • 1 onion, quartered
  • 2 carrots, roughly chopped
  • 1 head of garlic, halved crosswise
  • 6 quarts water (roughly 1.5 gallons)

Pro tip: If your turkey is larger (16-20 lbs), increase everything by about 25%. If it's smaller (10-12 lbs), reduce proportionally.


Step-by-Step Brining Process

1. Make the Brine (the night before, or at least 12 hours ahead)
  • In a large pot, bring half the water to a boil.
  • Add the salt and sugar, stirring until completely dissolved — this is important; undissolved salt won't distribute evenly.
  • Add all the aromatics (peppercorns, bay leaves, herbs, spices, vegetables, garlic) and let them infuse for 5-10 minutes off heat. This blooms the flavors beautifully.
  • Cool the brine completely — this is crucial. Pour it into a large bowl or container and let it reach room temperature, or speed this up by adding the remaining cold water once it's cooled slightly.
2. Prepare Your Turkey
  • Remove the giblets and neck from the cavity — save these for stock if you like.
  • Pat the skin dry with paper towels; this helps it brown better later.
  • Do NOT truss the bird before brining — you want brine to reach every surface, including inside the thighs.
3. Submerge Your Turkey

You need a vessel large enough to hold the turkey completely submerged. Options:

  • A food-safe 5-gallon bucket (line it with a large brining bag or heavy-duty plastic bag for safety)
  • A large stainless steel pot (if your stovetop is big enough)
  • Your refrigerator's crisper drawer with a large brining bag
  • A cooler with ice (if you're short on fridge space — keep it below 40°F)

The key: The turkey must stay fully submerged and at 38-40°F the entire time.

  • Lower the turkey into the brine carefully.
  • Weigh it down with a plate or use a brining bag to keep it submerged.
  • Brine for 12-24 hours for best results. Yes, you can brine longer, but beyond 24 hours the bird can start tasting overly salty.
4. Remove and Prepare to Cook
  • Lift the turkey out of the brine and let it drain — don't rinse it, since washing raw poultry can spread bacteria around your sink.
  • Pat it completely dry with paper towels; drier skin = better browning.
  • Let it sit uncovered in the refrigerator for 1-2 hours before roasting — this allows the skin to dry further for that gorgeous golden crispness.

Crucial Tips for Success

Temperature control is everything. If your brining vessel sits above 40°F, you risk bacterial growth. A cooler packed with ice works if your fridge is cramped, as long as you check it stays below 40°F.

Skip the rinse. Over-salted turkey is a real mistake, but the fix is sticking to the brining time, not washing the bird. Pat it dry thoroughly — inside the cavity especially.

Truss after brining, not before. You want brine flowing freely around the thighs and cavity during brining.

Don't reuse the brine. It has held raw poultry, so pour it away. Your pan drippings will give you all the flavor you need for gravy.

Adjust your roasting salt. Since the turkey is already salted internally, season the skin lightly when you roast — resist the urge to add the salt you normally would.


A Flavor Variation Worth Trying

Once you've mastered the classic brine, try this Asian-inspired version for something magical:

  • Keep the base salt, sugar, and water the same.
  • Swap the herbs for 2-inch piece of fresh ginger (sliced), 4 star anise pods, 3 dried shiitake mushrooms, 4 scallions (whites and greens), 1 cinnamon stick, and 2 tablespoons of soy sauce.

This creates an incredibly aromatic, slightly sweet-savory bird that's unforgettable.


The Bottom Line

Brining your turkey isn't complicated — it's just about planning ahead and understanding that salt + time + cold = incredibly moist, flavorful poultry. The best part? Once you master this technique with turkey, you can apply it to chicken, duck, pork — even fish for shorter brines. It's one of those foundational skills that opens doors.

You've got this, Mark. Your guests are going to be genuinely impressed by the difference brining makes.

My turkey is 14 lbs. how long to cook it and how?

Roasting Your 14 lb Turkey: Time, Temperature & Technique

Perfect size — a 14-pounder is actually ideal for even cooking and beautiful browning. Let me give you the complete roadmap, from cold bird to golden finish.


The Quick Answer

Roast at 325°F for approximately 3 to 3½ hours (roughly 13-15 minutes per pound after the initial sear). Target internal temperature: 165°F in the thickest part of the thigh (not touching bone).

But let me walk you through the how, because technique matters just as much as time.


Pre-Roasting Prep (Critical Steps)

1. Take the Chill Off
  • Remove the turkey from the fridge up to 1 hour before roasting.
  • This helps it cook more evenly — a fridge-cold bird tends toward overcooked breast and undercooked thighs. Don't leave raw poultry out for more than 2 hours.
  • Pat it completely dry one more time with paper towels; moisture = steam, and steam = pale skin instead of golden-brown.
2. Season Generously

Since your bird is already brined, go light on salt — you've got plenty inside already.

  • Rub the entire exterior (and under the skin if you're comfortable reaching in) with softened butter mixed with fresh herbs: thyme, rosemary, sage work beautifully.
  • Season with freshly cracked black pepper and just a whisper of salt.
  • Don't forget to season the cavity — a quarter of onion, some thyme sprigs, and a bay leaf inside adds aromatic flavor to the meat.
3. Prepare Your Pan
  • Use a sturdy roasting pan (not flimsy foil — it won't conduct heat evenly).
  • Line the bottom with roughly chopped vegetables: onion, carrot, celery. These create a flavor base for gravy and elevate the bird slightly for air circulation.
  • Add 1 cup water or stock to the pan bottom — this prevents drippings from scorching and gives you fond for gravy.

The Roasting Method: High-Heat Sear + Moderate Roast

This is the technique that gives you crispy, golden skin AND juicy meat. It's the approach fine restaurants use, and it works beautifully at home.

Step 1: The Initial High-Heat Sear (15 minutes)
  • Preheat your oven to 450°F.
  • Place the turkey breast-side up on the vegetables in your roasting pan.
  • Roast at 450°F for the first 15 minutes — this jump-starts the browning and crisps the skin beautifully.
  • Watch it carefully — the goal is golden, not burnt. If it's browning too fast, tent loosely with foil.
Step 2: The Moderate Roast (3-3¼ hours)
  • After 15 minutes, reduce heat to 325°F.
  • Tent the bird loosely with foil — this prevents the skin from burning while the meat continues cooking gently.
  • Roast undisturbed for the first 1.5-2 hours — resist the urge to baste constantly. Every time you open the door, heat escapes and cooking time extends.
Step 3: Basting & Monitoring (Last hour)
  • Remove the foil tent for the final 45 minutes to 1 hour — this lets the skin re-crisp and darken.
  • Baste every 20 minutes with pan drippings using a bulb baster (or spoon carefully). This adds flavor and keeps the breast moist.
  • Start checking temperature after 2.5 hours using a meat thermometer:
    • Insert it into the thickest part of the inner thigh (not touching bone).
    • Target: 165°F minimum for food safety.
    • Check the breast too — it should also reach 165°F.

Temperature Targets (The Real Ones)

Here's what most people get wrong: 165°F is the minimum for safety, but different parts finish at different times, and that's okay.

  • Thigh (thickest part): 165°F minimum (can go to 170°F without drying out)
  • Breast: 165°F (if you push it much higher, it gets stringy)
  • Thigh joint (where leg meets body): Should read 165°F

Pro move: Use an instant-read thermometer (I'm assuming you have one). Check multiple spots — thigh first, then breast, then the deepest part of the thigh. They'll finish at slightly different times, and that's perfect.


Troubleshooting During Roasting

Breast browning too fast, thighs still pale?
  • Tent just the breast loosely with foil, leaving thighs exposed.
  • This directs heat toward the slower-cooking thighs.
Skin isn't crisping in that final hour?
  • Increase temp to 400°F for the last 20-30 minutes, watching closely.
  • The bird's already cooked through; now you're just finishing the skin.
Worried it's drying out?
  • Stop basting immediately.
  • Tent with foil loosely for the remaining time.
  • Undercooked bird can always cook longer; overcooked bird is done.

The Critical Last Step: Rest the Bird

This is where the magic happens — do NOT skip this.

  • Remove the turkey from the oven when it hits 165°F in the thigh.
  • Let it rest uncovered for 20-30 minutes before carving.
  • During rest, carryover cooking raises the temperature slightly (perfectly safe), AND the juices redistribute throughout the meat instead of running out onto the cutting board.
  • Cover loosely with foil if your kitchen is cold, but leave the skin exposed so it stays crisp.

While it rests, make your gravy — see below.


Quick Gravy from Your Pan Drippings

Since you've got that vegetable-studded pan base and rich drippings:

  1. Strain the drippings into a measuring cup, pressing the vegetables to extract all their flavor. You should have roughly 1.5-2 cups.
  2. Skim off excess fat if you like, but some fat = flavor, so don't obsess.
  3. In a saucepan, whisk 3 tablespoons butter with 3 tablespoons flour over medium heat to make a roux — cook for 2-3 minutes, stirring, until it's golden and smells nutty.
  4. Gradually whisk in your strained drippings (warm, ideally), stirring constantly to avoid lumps.
  5. Simmer for 5 minutes, season with salt and pepper, and you've got silky, flavorful gravy — restaurant quality.

Timeline Summary for Your 14 lb Bird

  • Up to 1 hour before: Turkey out of fridge to take the chill off
  • 15 minutes: 450°F sear
  • 1.5-2 hours: 325°F with foil tent (no peeking)
  • 45 minutes - 1 hour: 325°F uncovered, basting every 20 minutes
  • Check temp at 2.5-3 hours; should be done by 3-3.5 hours total
  • 20-30 minutes: Rest uncovered
  • Meanwhile: Make gravy from pan drippings

Total time from cold fridge to carving: roughly 4-4.5 hours


Final Thoughts

A 14-pounder is forgiving — large enough to stay juicy, small enough to cook evenly without fussy temperature management. The high-heat start gives you that gorgeous golden skin your guests will love, and the moderate roast ensures the meat cooks gently.

Trust your thermometer, not the clock. Every oven runs slightly differently, and brined birds can cook a bit faster than un-brined ones. Start checking at 2.5 hours, and you'll be golden.

You've got this, Mark. That bird is going to be absolutely stunning.

what is the difference between an ETF and mutual fund?

ETFs vs. Mutual Funds: They're More Similar Than You'd Think

Let me start with the basics, then show you what actually sets them apart.

The Foundation: What They Have in Common

Both ETFs (Exchange-Traded Funds) and mutual funds are investment baskets—imagine a pie divided into many slices. Instead of buying individual stocks or bonds one by one, you buy a slice of a pre-made portfolio that holds dozens, hundreds, or even thousands of securities. A professional manager (or a computer algorithm) decides what goes inside that basket, and you own a proportional piece of the whole thing.

The big advantage? Instant diversification without having to pick individual investments yourself. You're spreading your money across many holdings at once, which helps reduce risk.

The Key Differences

Here's where they diverge:

How they trade:
  • Mutual funds are bought and sold directly through the fund company at the end of each trading day, at a single set price (called the NAV, or Net Asset Value). Think of it like ordering from a catalog—you place your order, and tomorrow you get your slice at today's closing price.
  • ETFs trade on a stock exchange during regular market hours, just like individual stocks. The price changes constantly throughout the day based on supply and demand.
Costs:
  • Mutual funds often charge higher fees, especially if they're actively managed (a person actively buys and sells holdings). They may also charge a sales commission ("load").
  • ETFs tend to be cheaper overall, especially index ETFs (which just track a market index with minimal buying/selling). You pay a brokerage commission when you buy, but ongoing fees are often lower.
Tax efficiency:
  • ETFs have a structural advantage—they can be more tax-efficient because of how they're designed. This matters more if you're investing in a taxable account.
  • Mutual funds can trigger capital gains taxes more easily when the manager sells holdings inside the fund.
Flexibility:
  • Mutual funds are straightforward: you decide how much to invest, and you're done.
  • ETFs let you set a specific price you're willing to pay (like buying individual stocks), or use certain trading strategies if you want. For most beginners, this extra flexibility doesn't matter much.

A Practical Comparison

FeatureMutual FundETF
When you can buy/sellOnce daily (end of day)All day during market hours
PriceFixed daily NAVFluctuates throughout the day
Typical feesHigher (0.5%–2%+)Lower (0.03%–0.5%+)
Tax efficiencyLowerHigher
Ease of useVery simpleSimple (trades like a stock)

The Bottom Line

For most beginning investors, ETFs have become the popular choice because they're cheaper, more tax-efficient, and easier to trade. That said, many mutual funds—especially lower-cost index funds—are perfectly fine investments. The difference in cost might be small if you're starting out, but over decades of compounding, even small fee differences add up significantly.

The key question isn't really "ETF or mutual fund?"—it's "What's inside the basket, and how much does it cost?" A cheap, diversified ETF that matches your goals beats an expensive mutual fund with the same holdings, every time.


Does the distinction between how they trade make sense? And are you curious about what kinds of things go inside these baskets (stocks, bonds, etc.)?

I'm in my early 40s, what would a good ETF be for me to buy. I want to hold it for a long time and don't want too much risk.

I appreciate the question—but I need to be straight with you here.

I can't tell you which specific ETF to buy, because that's personalized financial advice, and I'm not qualified to give it (and you'd need to talk to a licensed advisor for that kind of guidance anyway). But what I can do is teach you how to think about this decision so you can ask smarter questions and feel more confident when you talk to an advisor or do your own research.

Here's What Matters When Choosing an ETF

Your time horizon and risk comfort are clues, not the answer itself. When you say "long time" and "don't want too much risk," that's helpful—but the real picture also depends on:

  • How much money you're investing and when you might need it
  • Your other sources of income and financial security
  • Your actual comfort with seeing your portfolio drop 20% in a bad year (not just intellectually, but emotionally)
  • Your specific life goals—retirement at 60? A home purchase? Legacy planning?

An advisor who knows your full picture can help you answer these.

What You Can Do Right Now

Instead of asking "what ETF should I buy?", learn to ask yourself these questions:

1. What's inside the basket?
  • Does it hold mostly stocks (higher growth potential, more ups and downs) or a mix of stocks and bonds (steadier, but slower growth)?
  • Is it focused on one country, or diversified globally?
  • Does it track a specific index (like the S&P 500), or does someone actively manage it?
2. What are the costs?
  • Look at the expense ratio—this is the annual fee, expressed as a percentage. Lower is better. For a broad index ETF, anything under 0.25% is solid.
3. Does it match your goals?
  • If you're saving for retirement in 20+ years and have stable income, you can likely handle more stock exposure.
  • If you need the money sooner or sleep better with less volatility, a stock/bond mix might suit you better.

A Gentle Reality Check

Here's something I tell people: there's no single "right" ETF for your age. Two 42-year-olds can have completely different needs and risk tolerances. One might be comfortable with 90% stocks; another might sleep better with 50/50 stocks and bonds. Both are reasonable—it just depends on them, not their birthday.

The good news? Once you understand these concepts, you'll be able to evaluate any ETF that interests you and decide if it makes sense for your situation. That's way more powerful than me telling you a name.


What might help you next: Would it be useful if I explained how stocks and bonds work differently, so you can understand what "more risk" and "less risk" actually means? Or would you rather dive into how to think about the mix between them for your own goals?

I saw an ad for a single stock ETF. Why would I buy that instead of just buy the stock directly?

Great Question—This Gets at Something Important

You've spotted something that confuses a lot of people, so let's untangle it.

First, the Basics: What's a "Single Stock ETF"?

A single stock ETF is an ETF that holds just one company's shares (or sometimes a tiny handful). So yes, on the surface it seems weird: Why wrap one stock in an ETF package when you could just buy the stock itself?

The answer isn't usually about the stock itself—it's about the structure and features the ETF wrapper adds.

The Actual Reasons People Use Them

1. Fractional shares and lower entry cost
  • Some single-stock ETFs let you buy a tiny slice with less money upfront. If a stock trades at $500 per share and you only have $100, an ETF might let you own a proportional piece more easily.
  • (That said, many brokers now offer fractional shares directly, so this advantage is shrinking.)
2. Tax-advantaged account access
  • Some ETFs can be held in tax-advantaged retirement or savings accounts more flexibly than certain investments. This is a technical advantage depending on your account type.
3. Currency hedging
  • Some single-stock ETFs are hedged to your home currency, so you're not betting on currency fluctuations alongside the stock price. If you buy a foreign stock directly, you're exposed to both the company's performance and the exchange rate.
4. Dividends handled automatically
  • The ETF reinvests dividends for you seamlessly (in some cases), whereas buying the stock directly requires you to manage that yourself.

The Honest Truth

For most beginning investors, single-stock ETFs are a solution looking for a problem. Here's why:

  • If you want to own one company, just buy the stock directly. It's simpler and often cheaper.
  • If you want diversification and lower risk, buy a diversified ETF (one that holds hundreds of stocks or bonds across multiple companies and sectors).

A single-stock ETF gets you neither advantage—you're paying ETF fees but getting no diversification benefit.

A Misconception to Watch

Sometimes these ads make single-stock ETFs sound like a clever shortcut to owning a "hot" stock. That's marketing, not investing strategy. Owning one company—whether through an ETF or directly—is higher risk, not lower, because you're not diversified. If that company stumbles, your whole position suffers.


The pattern I'd notice: If an ad is pitching you a product that seems complicated or has to be justified with special features, ask yourself: Am I buying this because it actually fits my goals, or because it sounds clever? Usually the straightforward choice (a diversified ETF, or a single stock if you really want that company) is the better one.

Does this help clarify why diversified ETFs are often the simpler choice for building long-term wealth?

We're planning a trip to Japan and want to spend 4 or 5 days in Kyoto. What are some good things to do?

Oh, wonderful! Kyoto is absolutely magical—you're going to have such a special time there. Four to five days is actually a perfect window to really get to know the city without feeling rushed, so let me paint you a picture of what's possible.

The Highlights You Shouldn't Miss

Temple & Shrine Hopping Kyoto has over 2,000 temples and shrines, so you'll want to be strategic. The absolute classics are:

  • Fushimi Inari — Those iconic thousands of vermillion torii gates winding up a hillside. It's a bit of a trek from central Kyoto, but genuinely breathtaking, especially early morning when it's quiet. Budget 2–3 hours.
  • Kinkaku-ji (Golden Pavilion) — Stunning, famous, and crowded. Go early (like 8:30 AM) to beat the tour groups.
  • Arashiyama Bamboo Grove — Towering bamboo stalks creating this ethereal forest corridor. Again, arrive early or late afternoon to avoid the midday crush.
  • Kiyomizu-dera — Perched on a hillside with wooden platforms jutting out. The views across Kyoto from up there are spectacular.
  • Ginkaku-ji (Silver Pavilion) — Less mobbed than the Golden one, and the gardens are exquisite. More contemplative vibe.
Neighborhoods to Wander
  • Gion — The geisha district. Stroll the lantern-lit streets in the evening; it feels like stepping back in time. You might spot a geiko heading to an appointment.
  • Higashiyama — Charming pedestrian streets lined with traditional wooden machiya houses, small shops, and cafés. Great for wandering and getting a feel for old Kyoto.
  • Philosopher's Path — A peaceful canal-side walk lined with cherry trees (stunning in spring). Quiet, contemplative, and lined with small temples and galleries.

A Sample 4–5 Day Rhythm

Day 1: Arrive, settle into your accommodation, explore your immediate neighborhood. Evening stroll through Gion.

Day 2: Hit the big temples—Fushimi Inari early, then Kinkaku-ji. Afternoon in Arashiyama (bamboo grove + nearby temples like Tenryu-ji).

Day 3: Higashiyama district—walk the streets, visit Kiyomizu-dera and Ginkaku-ji. Lots of small museums and galleries if you want a quieter pace.

Day 4: Philosopher's Path walk, smaller temples in that area, or venture to nearby Kurama (mountain village with hiking and hot springs) if you want a day trip.

Day 5: Flex day—revisit a favorite spot, explore markets (Nishiki Market is famous for food and crafts), visit a museum, or take a half-day trip to Arashiyama's bamboo if you didn't get there.

Practical Notes

Getting Around: Kyoto's bus system is brilliant and cheaper than taxis. Buy a Subway & Bus 1-Day Pass (¥1,100) if you're taking 5+ rides. Honestly, buses beat trying to navigate the train system for most temples. Alternatively, rent a bicycle—Kyoto is relatively flat and cycle-friendly.

Seasonal Timing: This matters! Spring (late March–April) brings cherry blossoms but massive crowds. Autumn (October–November) offers crisp weather and gorgeous colors. Summer is hot and humid; winter is mild but can be gray. All seasons have their charm, though.

Crowds & Strategy: Kyoto is popular. Go early to major temples (7–8 AM), skip them during lunch hours (11:30–1 PM), or visit in late afternoon. Weekdays are quieter than weekends.

Etiquette Reminders: Remove shoes when entering temples (they'll have shoe racks). Be respectful in sacred spaces—keep voices low, don't touch offerings or religious items. Photography is usually fine, but some inner sanctums prohibit it (signs will indicate).

A Question for You

To fine-tune this further: When are you planning to go, and what's drawing you to Kyoto most? Are you a temple-and-culture devotee, more interested in local food and neighborhoods, or a mix? And are you traveling with anyone (partner, kids, friends), or solo? That'll help me suggest which temples to prioritize and what pace feels right.

Either way, you're going to have an absolutely wonderful time. Kyoto has this rare quality where it feels both incredibly ancient and totally alive at the same time. I'm excited for you! 🍁

We're thinking of early spring with my partner. We both like food and are interested in the cultural aspect but not as much temples.

Ah, perfect timing and mindset! Early spring in Kyoto is genuinely magical—the cherry blossoms (if you hit late March to early April) create this dreamy quality, and the weather is just lovely. And honestly? The fact that you're more interested in food and culture than temple-hopping means you're going to have a deeper experience. Kyoto's real magic is in its neighborhoods, its culinary traditions, and the way locals actually live.

A Food-Focused Kyoto

Let me be clear: Kyoto's food culture is world-class. It's the traditional heart of Japanese cuisine, and the respect for seasonal, local ingredients here is almost reverential.

Must-Do Dining Experiences
  • Kaiseki — This is haute Japanese cuisine, deeply seasonal, with meticulous presentations. It's pricey (¥8,000–30,000+ per person), but having it in Kyoto feels almost spiritual. It's the full cultural immersion. Book ahead; places fill up.
  • Nishiki Market — A covered arcade of 100+ shops and small eateries. Wander around, sample fresh sashimi, pickles, tofu, seasonal treats. Grab lunch here—it's lively, unpretentious, and delicious. Budget 2–3 hours.
  • Yudofu (hot pot tofu) — Kyoto's signature comfort dish, especially in the Arashiyama area. Simple, warming, and uses the highest-quality tofu. ¥2,000–5,000 per person.
  • Okonomiyaki & Takoyaki — Street food, fun, casual. Perfect for a casual lunch or snack.
  • Kyo-ryori (Kyoto cuisine) — Look for restaurants specializing in traditional Kyoto dishes. Lots use seasonal vegetables and river fish. Moderately priced compared to kaiseki.
  • Tea & Sweets — Visit a traditional tea house (chashitsu) and have matcha whisked fresh with a seasonal wagashi (traditional sweet). It's meditative and delicious. ¥1,000–2,000.
Neighborhoods for Food & Culture (These Are Golden)

Gion — Yes, it's famous for geishas, but it's also the culinary heart. Narrow lanes, lantern-lit evenings, traditional restaurants, and small bars (izakayas). You'll see geikos walking to appointments. The vibe is quintessentially Kyoto. Wander here at dusk—eat dinner, have a drink, soak it in.

Higashiyama — Beyond the temples, this district is a treasure trove of food, crafts, and local culture. Charming machiya cafés, small restaurants, pottery shops, and kimono boutiques. Perfect for a leisurely half-day wander with your partner.

Pontocho — A narrow alley along the Kamogawa River, lined with traditional wooden teahouses and high-end restaurants. It feels like stepping into another era. Quieter and more intimate than Gion, with incredible dining. Walk it at sunset.

Arashiyama (Beyond the Bamboo) — Yes, there's the famous bamboo grove, but the real gem is the town itself. Small restaurants, tea houses, riverside walks. Yudofu Sagano is a well-known spot for yudofu; go early or book ahead.

Nishijin — Kyoto's old weaving district, slightly off the tourist trail, with local shops, small eateries, and a genuine residential feel. Great for discovering cafés in old machiya townhouses and local favorites.

A Revised 4–5 Day Itinerary (Food & Culture Focus)

Day 1: Arrive & Settle Into Gion
  • Check into your accommodation (ideally in Gion, Higashiyama, or central Kyoto).
  • Afternoon: Wander Higashiyama district—no pressure to see everything, just absorb the vibe. Pop into small galleries, pottery shops, cafés.
  • Evening: Stroll Gion at dusk. Have dinner at a traditional restaurant or izakaya. Maybe grab drinks at a standing bar (tachinomiya) if you're feeling adventurous. This is where you'll see the geisha culture alive.
Day 2: Market & Culinary Deep Dive
  • Morning: Nishiki Market. Sample, graze, chat with vendors. Grab lunch here.
  • Afternoon: Visit a tea house for matcha and wagashi. Relax.
  • Evening: Book a kaiseki dinner somewhere special. This is the Kyoto experience. Let the chef guide you through seasonal delicacies.
Day 3: Arashiyama Food & Nature
  • Day trip to Arashiyama. Start with a peaceful walk along the river (it's stunning in spring).
  • Lunch at Yudofu Sagano or another local spot doing yudofu or kyo-ryori.
  • Afternoon: Wander the bamboo grove if you're interested, but honestly, the neighborhoods and small temples around there are equally lovely—less crowded, more authentic.
  • Evening: Return to central Kyoto or stay in Arashiyama for dinner. There are excellent restaurants there too.
Day 4: Local Neighborhoods & Cooking or Crafts
  • Consider a cooking class (many offer 2–3 hour sessions where you prepare kaiseki-style dishes). It's interactive, delicious, and deeply cultural.
  • Or a pottery workshop or kimono fitting (even just for photos—many shops rent gorgeous traditional kimono for a few hours). These are wonderful ways to engage with Kyoto's craftsmanship.
  • Afternoon/Evening: Explore a neighborhood like Nishijin or venture to Philosopher's Path if you haven't yet. It's lined with small temples, galleries, and cafés—very romantic for a couple.
  • Dinner at a casual spot—maybe ramen, okonomiyaki, or a neighborhood izakaya.
Day 5: Flex & Revisit Favorites
  • Sleep in. Revisit a favorite neighborhood or restaurant.
  • Visit Pontocho for a walk and maybe lunch along the river.
  • Do some last-minute shopping for crafts, tea, or souvenirs.
  • Evening: Final meal somewhere special, or a low-key dinner back in Gion.

Insider Tips for Spring

Cherry Blossoms (Sakura):
  • Peak bloom is usually late March to early April, but it varies year to year.
  • The blossoms last only 1–2 weeks, so timing is a bit of a lottery.
  • Evenings are magical—many temples and parks are lit up (yozakura) until late. Even if you're not a temple person, walking under blooming trees is transcendent.
  • Pro tip: The crowds during peak bloom are intense. If you're going early April, expect throngs. If you can go late March (earlier bloom), you might have better luck.
Getting Around:
  • Buses work well, but rent bicycles for Arashiyama—it's lovely and flat.
  • IC cards (like ICOCA) work on buses, trains, and shops. Buy one at the station.
Booking Ahead:
  • Kaiseki restaurants — Book 2–4 weeks in advance for good places.
  • Cooking classes — Many book up; arrange before arrival.
  • Tea houses — Some require advance booking; others accept walk-ins.
Spring Dining:
  • Spring vegetables (bamboo shoots, butterbur, spring greens) are everywhere and considered delicacies. Expect them on kaiseki menus.
  • Fresh river fish and new season ingredients make spring one of the best times to eat in Kyoto.

Questions to Sharpen This Further

A couple things that'd help me refine this:

  1. How many nights total are you thinking in Kyoto? (You mentioned 4–5 days, which I'm reading as 4–5 nights, but just confirming.)
  2. Budget-wise, are you comfortable splurging on a kaiseki dinner or two, or are you looking to keep meals more casual? This helps me balance fancy experiences with everyday gems.
  3. Is one of you more adventurous with food than the other? (e.g., do you want to hunt down offal, fermented things, unusual stuff, or stick to more familiar flavors?)

Either way, you two are going to have an absolutely wonderful time. Early spring in Kyoto with a focus on food and local culture? That's the recipe for a genuinely memorable trip. The city reveals itself to people who slow down and eat well. 🌸

Scroll to read
Type a message…

Real conversations, lightly edited. The Xperts are AI and can make mistakes.

Photos by Ruben Mavarez, Quin Engle, Nick Chong and Lucius Hunter on Unsplash.

Start free. Go further when you want.

  • Free

    $0

    • Chat with any Xpert
    • Basic credits every day
    • Create your own Xperts
    Get the app
  • Credit packs

    Pay as you go

    • Premium credits for the advanced model
    • Credits never expire
    • No subscription
    Get the app
  • Monthly

    A monthly subscription

    • Premium credits every month
    • The advanced model
    • Cancel any time in your app store
    Get the app

Honest answers.

Xperts are AI, not people. They're good at helping you learn, explore and prepare. They can make mistakes, so check anything important.

No. Xperts are AI guides built to help you explore, learn and plan. For legal, financial or health decisions, they help you prepare but don't replace a licensed professional.

An Xpert is built for one subject, remembers what matters to you, and has Skills for common tasks, so you don't have to explain yourself each time.

Yes, you can start for free. Credit packs and a subscription are there if you want more.

What you share in conversation, used to make later answers fit you. You can change or clear it at any time.

Xperts are AI and can be wrong. Check anything important.

Yes. Tell the app what you want help with and it builds the Xpert. You can also customize one that's already there.

Privacy · Terms

There's always more to explore.

Find an Xpert. Ask a question. Keep going until you understand it.

Join the iOS betaJoin the Android beta

Free to start. AskAnXpert is in beta; joining the beta installs it.

  • iPhone and iPad
  • Android

Scan with your phone's camera to get the app.

iOS 14.5 or later (iPhone and iPad) · Android 7.0 or later · Version 1.5.10

AskAnXpertAskAnXpert

When you really want to know.

Contact

  • Support
  • support@askanxpert.ai
  • privacy@askanxpert.ai

Legal

  • Terms of Service
  • Privacy Policy
  • Consumer Health Data Privacy Policy

Company

Agorex Inc
42 Oakwood Avenue N
Mississauga, ON L5G 3L8
Canada

© 2026 Agorex Inc. All rights reserved.

The Xperts are AI and can make mistakes.